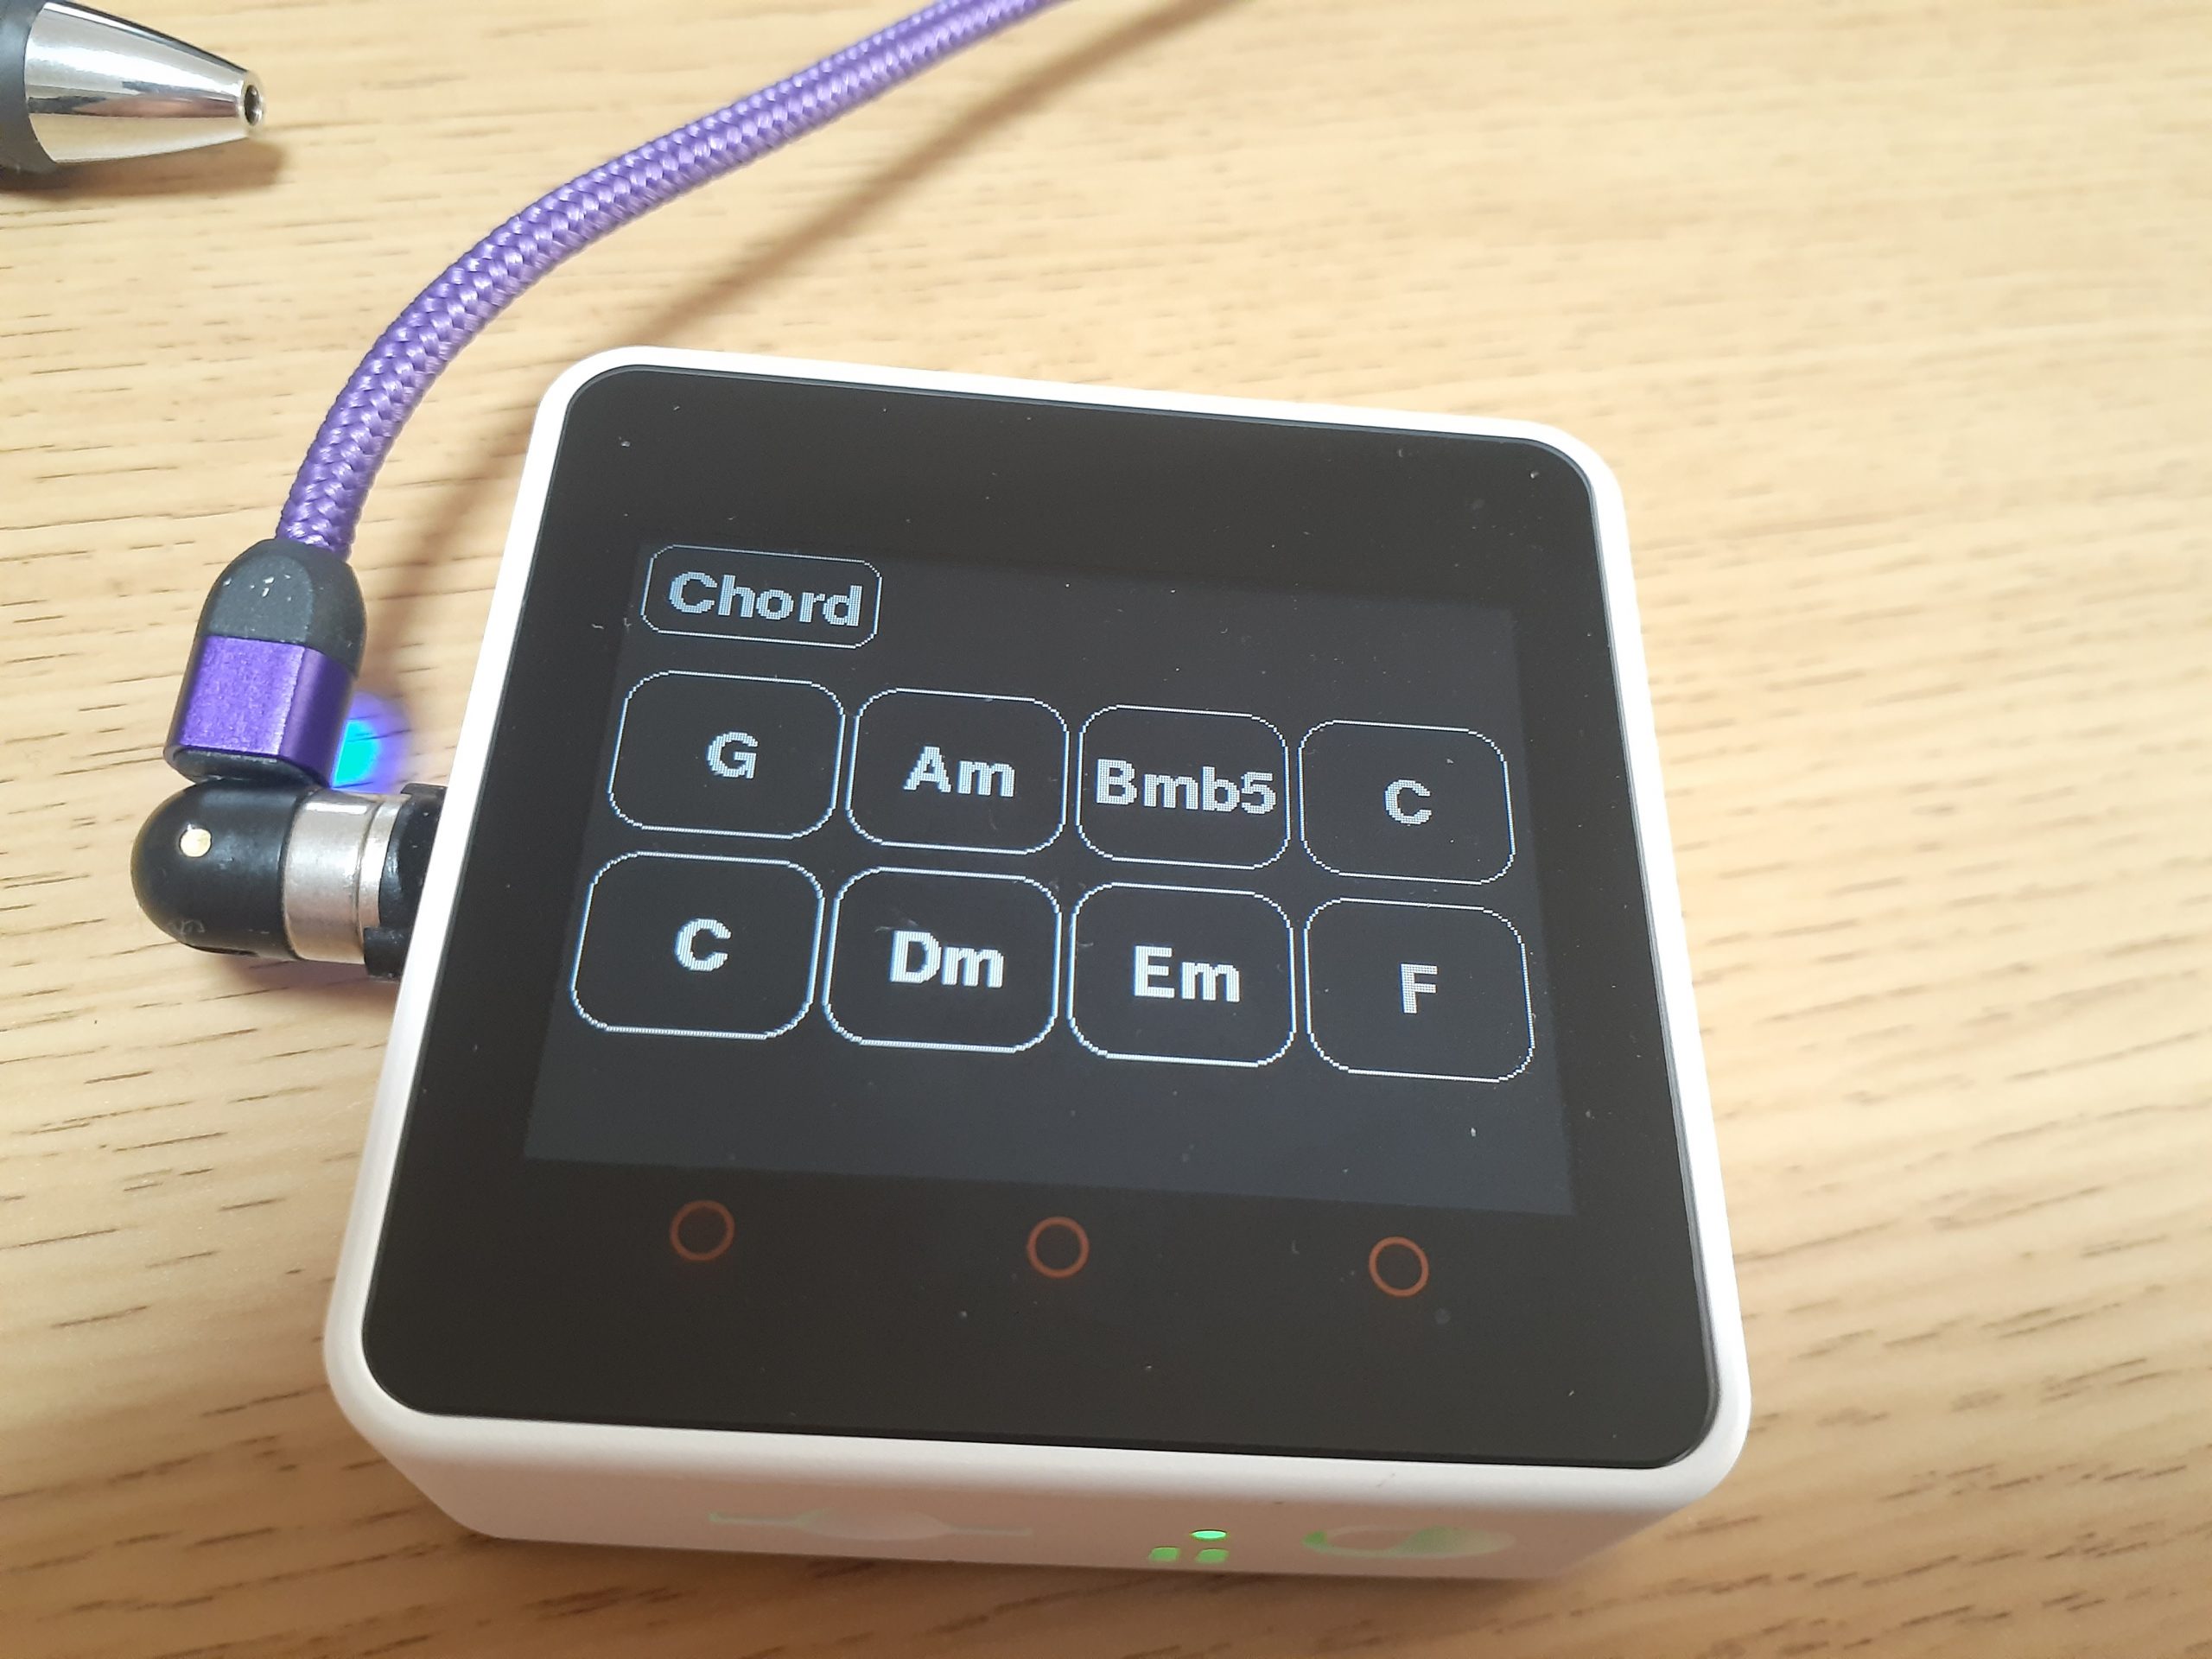
せっかくタッチパネルがわるのだから、そのままMIDIキーボードみたいに使ってみよう。ということで、M5Stack Core2でMIDIキーボードコントローラーって感じのものを作りました。ものすごい小さいMIDI鍵盤って雰囲気のやつ。続き。あらためて最初から説明。
普通に鍵盤だと1オクターブがやっと。せっかくマイコンで作るのだからひと味違う感じのものを作りたい。Core2のタッチパネルは試したところ多点タッチが無理っぽいので、和音を鳴らすのは難しいんじゃないか? とかいろいろあって、ワンキーでコードを鳴らせると楽しいかも、という結論に。
それでできたのがこれ。
デモ動画はAndroid版のCubasisを、Core2で弾いている。しかもコードモードのみ。
このCore2によるBluetooth MIDIキーボード。左上のボタンでNoteモード(単音)とChord(和音)を切り替えられるようになっています。
プログラムのコードはノートナンバーをベタ書きで、拡張とか今後のことをあまり考えていない。ほんとなら移調とかを見据えて作るのだろうけど、とりあえず鳴らすことを最優先で作ってしまいました。コード公開までにはなんとかしたいと思ってたのだけど、とにかく公開したほうが楽しいことになるかもということで公開。
/*
 * Arduino BLE-MIDI Transport
 * https://github.com/lathoub/Arduino-BLE-MIDI
 * arduino_midi_library
 * https://github.com/FortySevenEffects/arduino_midi_library
 * NimBLE-Arduino
 * https://github.com/h2zero/NimBLE-Arduino
 */
#include <M5Core2.h>
#include <BLEMIDI_Transport.h>

#include <hardware/BLEMIDI_ESP32_NimBLE.h>
#define DEVICE_NAME               "M5Core2 MIDI"
BLEMIDI_CREATE_INSTANCE(DEVICE_NAME, MIDI);

bool isConnected = false;
bool isChordMode = false;
uint8_t root = 0;
uint8_t old_notes[3];

ButtonColors cl_on  = {0x7BEF, WHITE, WHITE}; // タップした時の色 (背景, 文字列, ボーダー)
ButtonColors cl_off = {BLACK, 0xC618, 0xC618}; // 指を離した時の色 (背景, 文字列, ボーダー)

// ボタン定義名( X軸, Y軸, 横幅, 高さ, 回転, ボタンのラベル, 指を離した時の色指定, タッチした時の色指定)
// 上段
Button btn_g(  0,  56, 76, 65, false ,"g", cl_off, cl_on);
Button btn_a( 80,  56, 76, 65, false ,"a", cl_off, cl_on);
Button btn_b(160,  56, 76, 65, false ,"b", cl_off, cl_on);
Button btn_C(240,  56, 76, 65, false ,"c", cl_off, cl_on);
// 下段
Button btn_c(  0, 130, 76, 65, false ,"c", cl_off, cl_on);
Button btn_d( 80, 130, 76, 65, false ,"d", cl_off, cl_on);
Button btn_e(160, 130, 76, 65, false ,"e", cl_off, cl_on);
Button btn_f(240, 130, 76, 65, false ,"f", cl_off, cl_on);
// コードモードのボタン
Button btn_chord(0, 0, 84, 40, false ,"Note", cl_off, cl_on);

void setup() {
  M5.begin();  //Init M5Core.
  Serial.print("start...");

  M5.Lcd.fillScreen(BLACK);
  M5.Lcd.setTextColor(WHITE, BLACK);

  M5.Buttons.setFont(FSSB12); // 全てのボタンのフォント指定
  //btn_c.setFont(FSSB24); // 個別指定したい場合はこちら

  btn_c.addHandler(event_btn_c, E_TOUCH + E_RELEASE); // ボタンのイベント関数を指定
  btn_d.addHandler(event_btn_d, E_TOUCH + E_RELEASE);
  btn_e.addHandler(event_btn_e, E_TOUCH + E_RELEASE);
  btn_f.addHandler(event_btn_f, E_TOUCH + E_RELEASE);
  btn_g.addHandler(event_btn_g, E_TOUCH + E_RELEASE);
  btn_a.addHandler(event_btn_a, E_TOUCH + E_RELEASE);
  btn_b.addHandler(event_btn_b, E_TOUCH + E_RELEASE);
  btn_C.addHandler(event_btn_C, E_TOUCH + E_RELEASE);
  btn_chord.addHandler(event_btn_chord, E_TOUCH + E_RELEASE);
  M5.Buttons.draw(); // 全てのボタンを描画

  // コードモード
  // btn_chord.setLabel("Note");

  //BLE-MIDI  ●
  MIDI.begin();
  //接続  ●
  BLEMIDI.setHandleConnected(OnConnected);
  BLEMIDI.setHandleDisconnected(OnDisconnected);
}


void loop() {
  M5.update();

  if(M5.BtnC.wasPressed()) {
    noteOn(1, 60, 127);
  }
  if(M5.BtnC.wasReleased()) {
    noteOff(1, 60, 127);
  }
}  // loop

//BLE-MIDI送信
void noteOn(uint8_t channel, uint8_t pitch, uint8_t velocity) {
  MIDI.sendNoteOn(pitch, velocity, channel);
}
void noteOff(uint8_t channel, uint8_t pitch, uint8_t velocity) {
  MIDI.sendNoteOff(pitch, velocity, channel);
}
// コード送信 Note On
void chordOn(uint8_t pitch1, uint8_t pitch2, uint8_t pitch3) {
  MIDI.sendNoteOn(pitch1, 127, 1);
  MIDI.sendNoteOn(pitch2, 127, 1);
  MIDI.sendNoteOn(pitch3, 127, 1);
}
// コード送信 Note Off
void chordOff(uint8_t pitch1, uint8_t pitch2, uint8_t pitch3) {
  MIDI.sendNoteOff(pitch1, 0, 1);
  MIDI.sendNoteOff(pitch2, 0, 1);
  MIDI.sendNoteOff(pitch3, 0, 1);
}

void noteOnOff(Event& e, uint8_t note){ // イベント、ルートのノート
  // M5.Axp.SetLDOEnable(3, true); // 触感フィードバック▼

  if(M5.BtnA.isPressed()){
    Serial.print("BtnA isPressed : ");
  }

  if(isChordMode){  // コードモード
    if(e.type == E_TOUCH){ // note on ノートオン

      uint8_t notes[3];

      notes[0]=note + 0;
      notes[1]=60 + (note + 3) % 12;
      notes[2]=60 + (note + 7) % 12;

      if(note == 60 || note ==65 || note ==67 || note ==72){ //C,F,G
        notes[1]=note + 4;
      } else if (note == 71){
        notes[1] = note - 9;  // +3
        notes[2] = note - 6;  // +6
      }

      if(M5.BtnA.isPressed()){
        if(notes[0] == 60 || notes[0]==65 || notes[0]==67 || notes[0]==72){
          notes[1] = notes[1]-1; // メジャーなら3度を下げる
        } else {
          notes[1] = notes[1]+1; // マイナーなら3度を上げる
        }
      }

      chordOn(notes[0], notes[1], notes[2]);
      // 念のため
      old_notes[0]=notes[0]; old_notes[1]=notes[1]; old_notes[2]=notes[2];

      Serial.print("E_TOUCH / ");
      Serial.println(e.objName());

    }  else {  // note off ノートオフ

      uint8_t notes[3];

      notes[0]=note + 0;
      notes[1]=60 + (note + 3) % 12;
      notes[2]=60 + (note + 7) % 12;

      if(note == 60 || note ==65 || note ==67 || note ==72){ // C,F,G
        notes[1]=note + 4;
      } else if (note == 71){
        notes[1] = note - 9;  // +3
        notes[2] = note - 6;  // +6
      }

      if(M5.BtnA.isPressed()){
        if(notes[0] == 60 || notes[0]==65 || notes[0]==67 || notes[0]==72){
          notes[1] = notes[1]-1; // メジャーなら3度を下げる
        } else {
          notes[1] = notes[1]+1; // マイナーなら3度を上げる
        }
      }

      chordOff(notes[0], notes[1], notes[2]);
      // 念のため
      chordOff(old_notes[0], old_notes[1], old_notes[2]);

      Serial.print("E_RELEASE / ");
      Serial.println(e.objName());
    }

  } else {  // -----------------------    not isChordMode ノートモード

      if(e.type == E_TOUCH){ // note on
        noteOn(1, note, 127);
        Serial.print("Note : E_TOUCH / ");
      } else if(e.type ==  E_RELEASE) {    //note off
        noteOff(1, note, 0);
        Serial.print("Note : E_RELEASE / ");
      }
      Serial.println(e.objName());
  }

  //delay(40);
  M5.Axp.SetLDOEnable(3, false);  // 触感フィードバック▲
}

void event_btn_c(Event& e) {
  noteOnOff(e, 60);
}
void event_btn_d(Event& e) {
  noteOnOff(e, 62);
}
void event_btn_e(Event& e) {
  noteOnOff(e, 64);
}
void event_btn_f(Event& e) {
  noteOnOff(e, 65);
}
void event_btn_g(Event& e) {
  noteOnOff(e, 67);
}
void event_btn_a(Event& e) {
  noteOnOff(e, 69);
}
void event_btn_b(Event& e) {
  noteOnOff(e, 71);
}
void event_btn_C(Event& e) {
  noteOnOff(e, 72);
}


void event_btn_chord(Event& e) {
      if(e.type ==  E_RELEASE) {    //note off
        isChordMode = !isChordMode;

        M5.Axp.SetLDOEnable(3, true); //触感フィードバック
        delay(100);
        M5.Axp.SetLDOEnable(3, false);

        // const char *msg;
        if(isChordMode == 1){
          //msg = "Chord";
          btn_chord.setLabel("Chord");
          // コード名
          btn_c.setLabel("C");
          btn_d.setLabel("Dm");
          btn_e.setLabel("Em");
          btn_f.setLabel("F");
          btn_g.setLabel("G");
          btn_a.setLabel("Am");
          btn_b.setLabel("Bmb5");
          btn_C.setLabel("C");


        }else{
          //msg = "Note ";
          btn_chord.setLabel("Note");
          // ノート名
          btn_c.setLabel("c");
          btn_d.setLabel("d");
          btn_e.setLabel("e");
          btn_f.setLabel("f");
          btn_g.setLabel("g");
          btn_a.setLabel("a");
          btn_b.setLabel("b");
          btn_C.setLabel("c");
        }
        M5.Buttons.draw(); // 全てのボタンを描画

        M5.Lcd.fillRect(       90, 0, 80, 50, BLACK);

        Serial.print("isChordMode: ");
        Serial.println(isChordMode);
      }
}

// BLE-MIDI
// -----------------------------------------------------------------------------
// Device connected
// -----------------------------------------------------------------------------
void OnConnected() {
  isConnected = true;
  M5.Lcd.fillRect(       200, 0, 120, 50, BLACK);
  //digitalWrite(LED_BUILTIN, HIGH);
  M5.Lcd.setTextSize(1);
  M5.Lcd.setTextColor(WHITE, BLACK);
  M5.Lcd.setCursor(200, 18);
  M5.Lcd.printf("   Connected.");
}

// -----------------------------------------------------------------------------
// Device disconnected
// -----------------------------------------------------------------------------
void OnDisconnected() {
  isConnected = false;
  //digitalWrite(LED_BUILTIN, LOW);
  M5.Lcd.fillRect(       200, 0, 120, 50, BLACK);
  M5.Lcd.setTextSize(1);
  M5.Lcd.setTextColor(WHITE, BLACK);
  M5.Lcd.setCursor(200, 18);
  M5.Lcd.printf("Disconnected.");
}
必要なライブラリは最初のあたりに。タッチパネルのコードで参考にしたプログラムのコメントも一部そのまま残っています。とても助かりました。これがなければ、今回のプログラムを作ることはありませんでした。ありがとうございます。
M5Stack CORE2 UiFlowからArduino開発環境への移植 ~ タッチパネル × Faces(エンコーダ) × Bluetoothデバイス制御
それから、ボタンを触った時に「触った!」っていうのがわかるように、モードボタンのみフィードバックを加えてみました。本体がブルッと震えます。参考にしたのは以下。ありがとうございます。
なお、今回、ノートを鳴らすボタンは触感フィードバックなし。タイミングによってはMIDI送信が遅れる気がしたもので(よくわかってない)。きっとうまくやる方法があるとは思うんですけども。
以上、M5Stack公式からシェアしてね、という感じのリクエストがあったので、まとまってはないですが、公開しておきます。
あと、スクリーン下の3つのボタンも使ってみました。左(BtnA)は、同時押しでメジャー、マイナーの切り替え機能(たとえばCがCmになる)。複数ボタンの同時押しをなんとかしようとすると、ボタン位置に気をつけないとうまくいかない感じです(検証不足ですが、違うかも)。
右(BtnC)はタッチパネルとの反応速度の違いをはかるために普通にノートを割り当て。結果的には体感では変わりなかったんですけども。ほんとのところどうなんですかね?
iOSとかMacならOS標準のおなじみの感じでBLE-MIDIデバイスとして接続できると思われます。Windowsなら拙作のMIDIberryとか使ってください。AndroidならMIDI+BTLEみたいなプログラムで接続してしまえば、その後はほかのMIDI対応アプリのデバイスとして選択できるようになります。Cubasisもそんな手順でつながります。不明点あればコメントください。
Core2のタッチパネルは、反応がにぶいっていう不満点もあるんですが、コードに問題があるかもです。ご存知の方、教えて下さい。
それから、これをたたき台にしていろいろ作ってもらえるとうれしいです。参考にします!
あと、こんなビデオも公開してます。

コメント