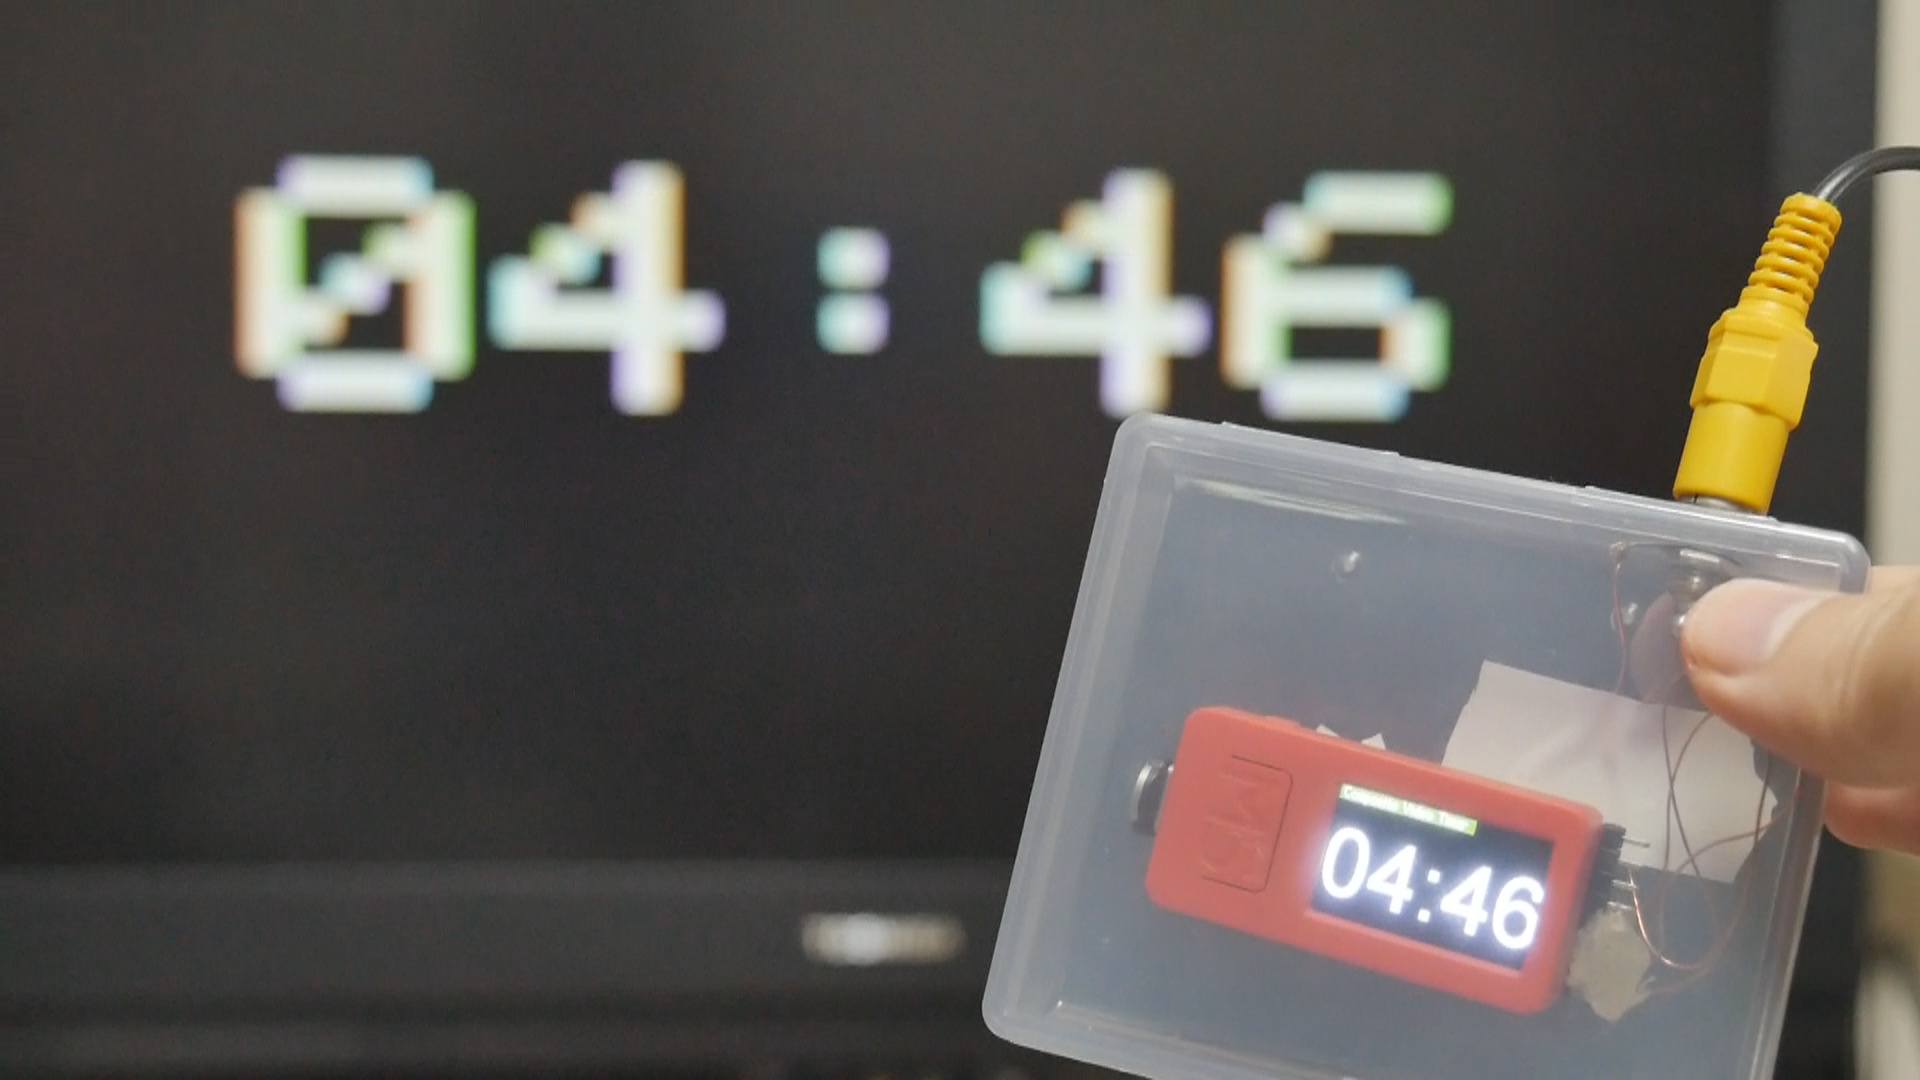
小中学校にはいまだにブラウン管テレビが存在するそう。これを活用できないかと思い、タイマーを製作。小テストやドリルなどを実施する際に、残り時間を大きな画面で確認できます。
動作デモ。
必要な材料や作り方などはProtoPediaに投稿しました。
学校の古いテレビを活用 テレビに映せるタイマー
プログラミングにはArduino IDEを使用。使用ライブラリは以下のコード内に記しました。
/*
 *
 *  使用ライブラリ
 *  https://github.com/Roger-random/ESP_8_BIT_composite
 *  https://github.com/tobozo/M5Stack-SD-Updater
 *
 *  Aボタンでスタート、ストップ
 *  Bボタンでリセット
 *  電源ボタンで時間選択
 *  電源ボタン長押しで電源OFF
 */

#include <ESP_8_BIT_GFX.h>
#include <M5StickCPlus.h>
#include <M5StackUpdater.h> // M5Stack SD-Updater

uint32_t targetTime = 0;                    // for next 1 second timeout

static uint8_t conv2d(const char* p); // Forward declaration needed for IDE 1.6.x

uint8_t hh = conv2d(__TIME__);
uint8_t mm = 3, ss = 0;

boolean isMeasuring = false;
boolean isSelectable = true;

byte omm = 99, oss = 99;
byte xcolon = 0, xsecs = 0;
unsigned int colour = 0;

int def_xpos = 0;
int def_ypos = 40;
int mode = 0;
int mode_min[] = {3, 1, 5, 7, 10};

// Create an instance of the graphics library
ESP_8_BIT_GFX videoOut(true /* = NTSC */, 8 /* = RGB332 color */);

// タイトル表示
void printTitle(String s){
  M5.Lcd.setCursor(0, 0, 2);
  M5.Lcd.setTextColor(WHITE, DARKGREEN);
  M5.Lcd.println(" " + s + " ");
}

// 最初の時間表示
uint8_t font_face = 8; // フォント指定
void printMinutes(String s){
  M5.Lcd.setTextColor(TFT_YELLOW, TFT_BLACK);
  M5.Lcd.setTextSize(1);
  M5.Lcd.drawString(s, def_xpos, def_ypos, font_face);
  M5.Lcd.setTextColor(TFT_WHITE, TFT_BLACK);
}

//タイマー終了時のBEEP
void beep(){
      M5.Beep.tone(880, 150); // A
      delay(200);
      M5.Beep.tone(678, 150); // E
      delay(200);
      M5.Beep.tone(440, 150); // A
      delay(150);
      M5.Beep.tone(880, 150); // A
      delay(200);
      M5.Beep.tone(678, 150); // E
      delay(200);
      M5.Beep.tone(440, 150); // A
      delay(150);
}

void setup(void) {
  M5.begin();

  //M5Stack SD-Updater
  if(digitalRead(BUTTON_A_PIN) == 0) {
    Serial.println("Will Load menu binary");
    //updateFromFS(SD);
    updateFromFS(SPIFFS);
    ESP.restart();
  }

  M5.Lcd.setRotation(3);  // 画面方向

  M5.Lcd.fillScreen(TFT_BLACK);
  M5.Lcd.setTextSize(1);

  printTitle("Composite Video Timer"); // タイトル
  printMinutes("03:00"); // 分表示

  targetTime = millis() + 1000;

  // Initial setup of graphics library
  videoOut.begin();
}


void loop() {
  M5.update();
  M5.Beep.update();   // tone関数で鳴らした音が指定時間経過していたら止める

  //ボタンA
  if (M5.BtnA.wasReleased()) {
      isSelectable = false;   // 分の選択を停止
      if(!(mm == 0 && ss ==0)){  // 00:00 でなければ
        isMeasuring =! isMeasuring;
        //Serial.println("Mesuring changed");
      } else {
        omm = 99;
        mm = mode_min[mode];
        ss = 0;
        if(mm < 10){
          printMinutes("0" + String(mm) + ":00");
        } else {
          printMinutes(String(mm) + ":00");
        }
        isSelectable = true;
      }
      delay(50);
  }

  // ボタンB
  if (M5.BtnB.wasReleased()) {
      isMeasuring = false;

      omm = 99;
      mm = mode_min[mode];
      ss = 0;
      if(mm < 10){
        printMinutes("0" + String(mm) + ":00");
      } else {
        printMinutes(String(mm) + ":00");
      }
      isSelectable = true;  // 分数選択可能に
      delay(50);
  }


  // 電源ボタン
  int axpButton = M5.Axp.GetBtnPress();
  if(axpButton == 2){
    //Serial.println("++++ PowerBtn pressed +++++");
    if(isSelectable){  // 黄色いときだけ
      mode ++;
      if(mode > sizeof(mode_min)/sizeof(int) -1 ){
        mode = 0;
      }
      //Serial.print("mode: "); Serial.println(mode);
      omm = 99;
      mm = mode_min[mode];
      ss = 0;
      if(mm < 10){
        printMinutes("0" + String(mm) + ":00");
      } else {
        printMinutes(String(mm) + ":00");
      }
    }
    delay(50);
  }

  if (targetTime < millis() && isMeasuring ) {
    // Set next update for 1 second later
    targetTime = millis() + 1000;

    // Adjust the time values by adding 1 second
    if(ss == 0 && mm ==0 ){
      isMeasuring = false; // stop
      beep();
    } else {
      ss = ss -1 ;              // Advance second
      if (ss == 255) {    // Check for roll-over
        ss = 59;          // Reset seconds to zero
        mm = mm -1;            // Advance minute
        if (mm == 255) {   // Check for roll-over
          mm = 0;
        }
      }
    }

    // Update digital time
    int xpos = def_xpos;
    int ypos = def_ypos; // Top left corner ot clock text, about half way down
    int ysecs = ypos; // + 10;

    if (omm != mm) { // Redraw hours and minutes time every minute
      omm = mm;
      if (mm < 10) xpos += M5.Lcd.drawChar('0', xpos, ypos, font_face);
      xpos += M5.Lcd.drawNumber(mm, xpos, ypos, font_face); // Draw minutes
      xsecs = xpos; // Sae seconds 'x' position for later display updates
    }
    if (oss != ss) { // Redraw seconds time every second
      oss = ss;
      xpos = xsecs;

      // コロン
      if (ss % 2) { // Flash the colons on/off
        M5.Lcd.setTextColor(0x39C4, TFT_BLACK);        // Set colour to grey to dim colon
        // M5.Lcd.drawChar(':', xcolon, ypos - 4, 6);     // Hour:minute colon   // -8, 8
        xpos += M5.Lcd.drawChar(':', xsecs, ysecs-0, font_face);  // Seconds colon  // 6
        M5.Lcd.setTextColor(TFT_WHITE, TFT_BLACK);    // Set colour back to yellow
      }
      else {
        // M5.Lcd.drawChar(':', xcolon, ypos - 4, 6);     // Hour:minute colon  // -8,8
        xpos += M5.Lcd.drawChar(':', xsecs, ysecs-0, font_face);  // Seconds colon // 6
      }

      //Draw seconds
      if (ss < 10) xpos += M5.Lcd.drawChar('0', xpos, ysecs, font_face); // Add leading zero
      M5.Lcd.drawNumber(ss, xpos, ysecs, font_face);  // Draw seconds
    }
  }

  // ビデオ出力
  videoOut.waitForFrame();
  // Clear screen
  videoOut.fillScreen(0);

  // Draw text in the middle of the screen  (256 x 240)
  videoOut.setCursor(15, 80);  // 25, 80
  if(isSelectable){
    //videoOut.setTextColor(0x5F); // Raising red
    videoOut.setTextColor(0xFC); // Yellow
  }else {
    videoOut.setTextColor(0xFF); // 白
  }
  videoOut.setTextSize(7);
  videoOut.setTextWrap(false);

  String b_mm = "0" + String(mm); // Serial.print(b_mm); Serial.print(", ");
  String b_ss = "0" + String(ss); // Serial.println(b_ss);
  String to_out = b_mm.substring(b_mm.length()-2) + ":" + b_ss.substring(b_ss.length()-2);
  videoOut.print(to_out );
}

// Function to extract numbers from compile time string
static uint8_t conv2d(const char* p) {
  uint8_t v = 0;
  if ('0' <= *p && *p <= '9')
    v = *p - '0';
  return 10 * v + *++p - '0';
}
タイマー作成には以下の記事を参考にしました。ありがとうございました。
以前、M5StickCで同様のタイマーを制作しましたが、残り時間がゼロになったときに音を鳴らしたいので、M5StickC Plusで作り直しました。そのビデオは以下。あまり変わってないです。
注意
ここで作成したデバイスが出力するビデオ信号が正しいものとは限りません。テレビ側を壊してしまう可能性がないわけではありません。壊れてもいい古いテレビで試すことをおすすめします。
ご使用はご自身の責任で行ってください。ライブラリのドキュメントも御覧ください。
当方では、液晶テレビの東芝REGZA 32H3000(2007年ごろ購入)のビデオ入力で試したところうまくいきましたが、うまくいかないテレビもありそうです。

コメント